
Menu
Doral Stamped Concrete Patio Checklist & Guide
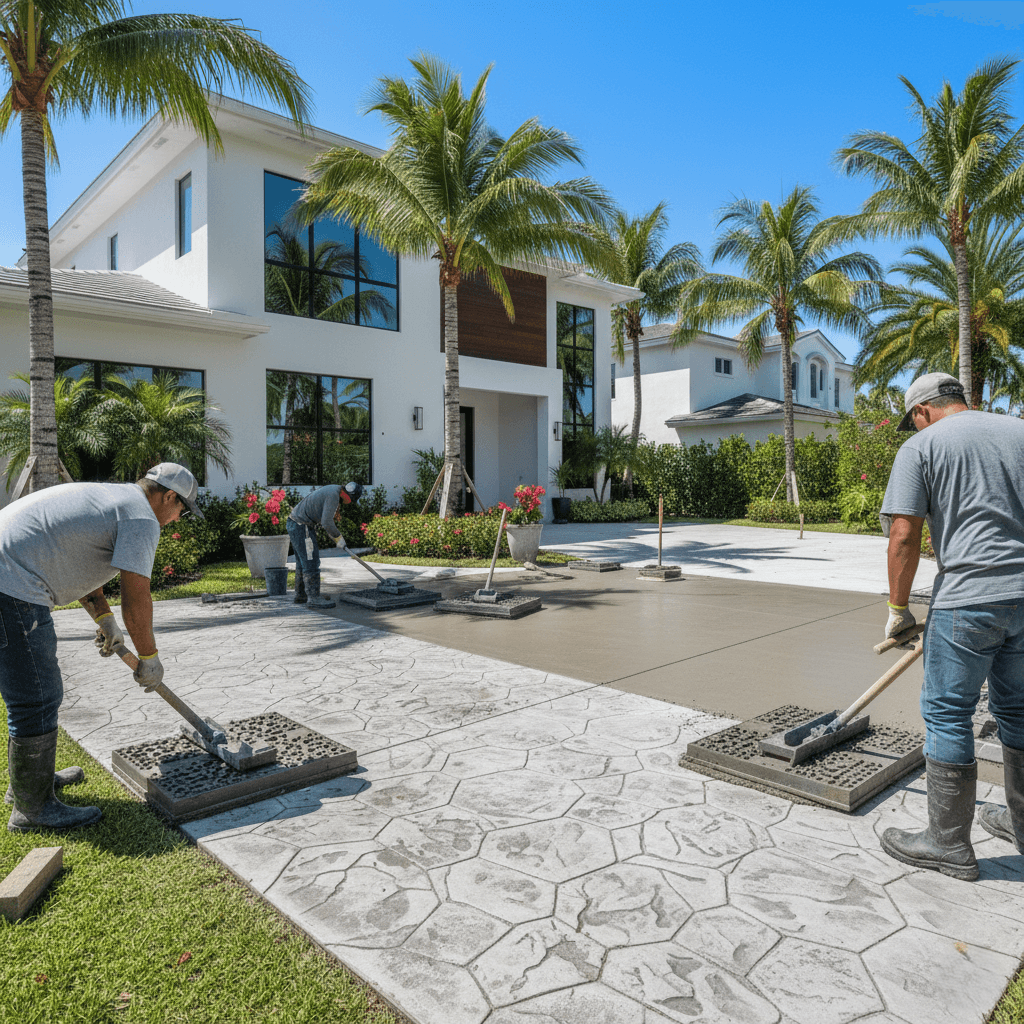
Stamped Concrete Patio Doral
To install a stamped concrete patio in Doral, you need to plan carefully and get all of the correct permits as well as adhere to the Florida Building Codes. The installation process for a stamped concrete patio has to be done at the right time with the right professionals, or it may end up looking poorly in South Florida’s harsh climate. This complete checklist will ensure that each step required to produce the best possible outcome from the first planning phase through the last seal coat and regular maintenance is addressed. If you follow the guidelines outlined in this checklist, you can ensure that your stamped concrete patio will look great and last for years to come by avoiding any unnecessary permit issues and/or construction delays, as well as any other potential issues that could arise when installing stamped concrete in Doral.
Pre-Installation Planning and Permits
Pre-construction planning is an important step for your stamped concrete patio project. Please apply for and receive a stamped permit from the City of Doral Building Department. A stamped permit will be issued once the required plan and specifications are submitted with a copy of your approved site plan. The permit will allow your contractor to proceed with preparing the base for your stamped concrete patio. A stamped permit will also assure that the work is being done according to the City of Doral’s specifications.
If your project costs exceed $2,500, please submit a Notice of Commencement (NOC) prior to submitting your permit to the Miami-Dade County Clerk of Courts. Your contractor should have a valid business license issued by the City of Doral and carry sufficient liability insurance and workers’ compensation insurance. Permit inspections will occur during various stages of your project; these may include base preparation, placing of reinforcement, and the completion of your project.
Stamped Concrete Pattern Design
Choose a pattern for your stamped concrete that complements the style of your home and the surrounding homes in your neighborhood. Also consider the amount of maintenance your new stamped concrete will need, how much slip-resistant it needs to be, and the amount of sun that will hit the stamped concrete. In addition, be sure to coordinate your pattern so that there are no large gaps or breaks in the design. This will help to create a cohesive look for your finished stamped concrete patio.
Excavation of the Patio Area
The patio area needs to be excavated down to the proper depth for the base materials and the concrete. Typically, this is about 6-8 inches below the final grade of the patio. All organic matter, such as dirt, leaves, and branches, must be removed from the patio area. Any unstable soil that could settle must also be removed. After removing the unstable soil, grade the sub-grade to the proper slope to drain water away from the house and towards the drainage area.
Base Material and Compaction
After grading the sub-grade, install a compacted base material to stabilize the sub-grade. The type of base material used depends on the type of soil you have under your patio. For most soils, a sand and/or gravel mixture works well. Compacted base materials will help to stabilize the sub-grade and reduce settlement. Mechanical compaction equipment should be used to achieve the required density for the base material. It is essential to verify the correct elevation of the base before installing the forms for the concrete.
Form Installation
Forms for your concrete patio should be installed with straight, sturdy, and long-lasting materials. These materials will be able to hold up against the pressure of the wet concrete without buckling or moving. The forms should be installed at the correct elevation with enough stakes and bracing to keep them stable. Form release agents should be applied to the inside of the forms to help prevent the concrete from sticking to the forms and to make removing the forms easier after the concrete cures.
Reinforcement
Depending on the size of the patio and the expected load, either welded wire mesh or steel rebar should be placed in the concrete. The reinforcement should be placed in accordance with the engineer’s specifications, and the rebar should be supported at the correct elevation with chairs or blocks to prevent the rebar from being displaced during the pouring of the concrete.
Expansion Joints
Expansion joints need to be planned for your stamped concrete patio to account for the thermal expansion caused by changes in the temperature in Doral. If possible, the joints should be located so that they align with the lines of the stamped pattern. The tools and materials needed for the expansion joints should be prepared before the concrete is poured.
Concrete Mix Design and Ordering
For your stamped concrete patio, you will want to use a concrete mix design that contains a higher cement content than what would be used for a standard patio. Additionally, the concrete mix design should include a combination of aggregates that will produce the best possible finish for your stamped concrete. When ordering the concrete, choose a supplier who is experienced in making decorative concrete mixes. Also, be sure that the supplier will be able to consistently batch their mixes to ensure a uniform color for your stamped concrete patio. Try to order the concrete in advance to ensure timely delivery to the job site.
Delivery and Placement of the Concrete
When receiving the concrete, try to have the truck deliver the concrete as close to the final location as possible to help minimize mixing and maintain the mix consistency. During the placement of the concrete, be careful to place it smoothly and evenly without disrupting the mix or causing weak spots in the concrete. Make sure to properly screed the concrete to the correct elevation and smoothness using a laser level or grade stakes.
Initial Finishing
The first layer of finishing should be done to remove any air pockets and bring the cream to the surface. This will prepare the surface of the concrete for the color application and the stamping. Be sure to monitor the condition of the concrete and adjust your finishing accordingly due to the varying weather conditions and characteristics of the concrete.
Preparing the Surface for Stamping
Before stamping the concrete, test to see if the surface is ready by performing a fingerprint test. The ideal impression should be about 3/16 to 1/4 inch deep and clean. Also, check to see that the surface of the concrete has reached the right state of plasticity for stamping to take place. Once you are satisfied with the surface, apply a broadcast color hardener evenly using the right tools and techniques.
Execution of the Stamping Process
Apply a release agent evenly to the surface of the concrete using brushes or sprays to prevent the stamp from adhering to the surface of the concrete. Place the stamps in a systematic manner, starting from the center point of the patio and continuing outward from the center point. Be sure to keep each row of stamps aligned correctly with one another to maintain a consistent pattern. Use tamps or walk over the stamps to apply even pressure and get a good impression.
Working within Time Limits
Work quickly to complete the stamping process within the allotted time frame, which usually takes about 2-4 hours, depending on the weather and the condition of the concrete. Work together with the rest of the crew to keep the process going continuously and avoid having uneven impressions. Once you have completed the main area of the patio, use flexible stamps or hand tools to do the edge texturing and blend it with the rest of the stamped area.
Checking the Pattern and Quality Control
Keep track of the pattern alignment and check the texture and impression depth as you go to make sure the pattern is consistent and of good quality. If you find a problem spot, address it now while the concrete is still workable.
Protection of Newly Stamped Concrete
Use a curing compound or a moisture retainer to protect the newly stamped concrete from drying out too quickly. Do not let anyone walk on the patio until the curing period has been completed as per local regulations. Keep an eye on the temperature and moisture content of the concrete during the initial curing phase.
Removing the Forms and Cleaning the Surface
Once the concrete has cured for the recommended amount of time, carefully remove the forms to avoid damaging the textured edges of the stamped concrete. Also, clean off any residue from the release agent that may be left on the surface of the stamped concrete using the proper cleaning method that will not harm the texture of the concrete.
Final Curing and Protection
Let the concrete cure for the recommended amount of time before applying the sealer. Protect the stamped concrete from the elements during the curing phase. Implement additional protection measures as needed based on the weather conditions in the Doral Central Park area.
Choosing a Sealer and Final Protection
Choose a sealer that will adequately protect the stamped concrete from the UV rays and excessive moisture found in South Florida. Select a sealer that provides the desired color and sheen. Follow the manufacturer’s recommendations for cleaning the surface before applying the sealer. Use the proper tools and techniques for applying the sealer.
Waiting for the Sealer to Dry and Applying Maintenance Instructions
Wait for the recommended amount of time for the sealer to dry before allowing foot traffic on the completed patio. Provide the homeowner with written instructions detailing how often to re-seal the patio, how to clean the patio, and how to prevent damage to the stamped concrete.
Documentation and Record Keeping
Record all of the details of your stamped concrete patio installation, including the type of concrete used, the formulation of the color, and the type of sealer used. Include warranty information and contact details for any future maintenance and repair issues. Schedule follow-up inspections to ensure the stamped concrete patio continues to perform optimally and to catch any early warning signs of problems.
At Doral Concrete Works, we follow this checklist for every single stamped concrete patio we build to ensure that our customers receive the same high-quality, long-lasting results. Our experience with Doral’s unique environmental conditions and permitting processes enables us to manage your project effectively, providing you with the high-quality, long-lasting stamped concrete patio that you want for your property.
LATEST POSTS